
How to Choose an Image Masking Service Provider
A quality image masking service provider should be able to provide you with high-quality photos quickly and at an affordable price. They should also be able to meet your deadlines and offer unique arrangements for special or emergency projects.
Using an image masking service can make your ecommerce website look more professional and attractive. It can remove distracting backgrounds and help you highlight the most important features of your products.
Clipping Path
Creating a clipping path involves using software tools to draw a path around an image, separating it from its background. The result is a clean, precise cut-out that can be used in a variety of ways. Clipping paths are an essential tool for graphic designers and photographers, as they help them create high-quality images. However, the process can be time-consuming if it is not done properly. There are many tools and techniques that can be used to make the process faster and easier, so it is important to experiment with different methods.
The most common use of clipping path is to remove the background from product images. This can improve the look of a product and make it more attractive to potential customers. This is especially important for e-commerce businesses, as the images they use to attract customers will be the first impression they have of the business.
Another important use of clipping path is to color correct an image. Often, cameras fail to capture realistic colors, which can detract from the appearance of a product. This is especially true for images of jewelry, furniture, and other home goods. Clipping path can help to correct this issue by removing the background and highlighting the product’s features. This will make it appear more appealing to potential customers and help to increase sales.
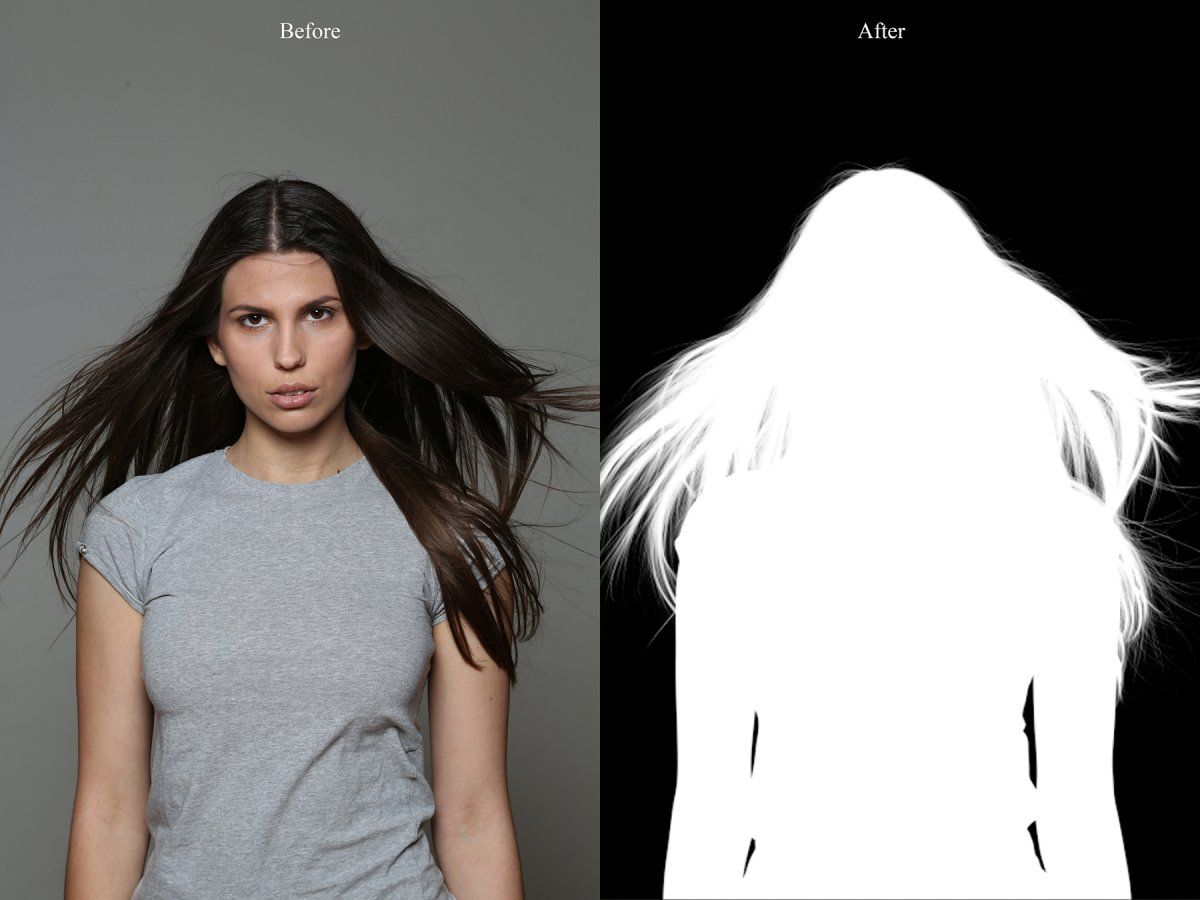
Layer Masking
Layer masks are a great tool for non-destructive editing. They allow you to hide and reveal parts of an image while keeping the rest intact. This makes them a very useful tool for editing photos that have complex compositions, such as landscape images or shots that contain multiple objects.
To add a layer mask to a layer, select the layer and click the Layer Mask button (a white square-shaped button with a circle inside) located at the bottom of the layers panel. Once you have clicked the layer mask button, a thumbnail of the layer mask will appear beside the layer’s image layer thumbnail in the layers panel.
Unlike the eraser, layer masks are editable, so you can easily undo any mistakes you make. Additionally, layer masks can be used with any adjustment layer, allowing you to target specific areas of the photo.
A layer mask’s alpha channel determines how much of the masked content is revealed. The higher the alpha, the more transparent the layer mask. You can also use different shades of grey on a layer mask to achieve varying levels of transparency.
While you can use a selection tool to create a mask, it’s much easier to do so with a layer mask. You can also use a brush to paint on the layer mask, which allows you to be more precise when editing your image.
Color Masking
Color masking allows you to regulate the transparency of an image. Unlike the fill and opacity tools, which only control the overall transparency of an entire layer, color masking lets you select a specific area of the image and regulate how transparent it is. For example, you can create a mask that makes the sky look like it’s being shown through a tinted glass or filter.
You can also use the Color Range tool to target a specific color and make adjustments on that area alone. This is much more precise than if you used the regular selection tool. This is especially useful if you have an image with a darker foreground and brighter background, which require different editing adjustments.
The Fuzziness slider adjusts how fuzzy the mask is, which can help speed up the process by reducing the number of pixels that are actually selected. It’s important to remember that while this tool is very helpful, it should not be overused because it can result in a blurry and unnatural edit. It’s best to only use it when necessary, especially for more complex images. For example, it’s ideal for removing unwanted texture from portraits and other human subjects. It can also be used to smooth out a group of images. This is a quick way to apply the same effect across multiple shots without retouching them by hand.
Collage Making
In the digital world, image masking services can be a valuable tool for creating beautiful images. This photo editing technique can be used for many different purposes, including retouching photos or removing backgrounds from transparent objects. The best way to learn about this technique is to find a website that provides tutorials. Many websites also offer free trials.
Collage making is an engaging and expressive form of art that allows the artist to visually communicate thoughts and feelings that are difficult to express verbally. It fosters self-expression, creativity, emotional well-being, and memory preservation. In addition, the process of constructing a collage can help to relieve stress and anxiety.
To make a collage, start with a blank surface, such as a poster board or a piece of heavy paper. Intuitively select images, words, or textures that catch your eye and cut them out. Arrange them on a base and experiment with the composition until you are satisfied with the result.
Creating a collage is a fun and creative exercise that can be done with a variety of materials, including photographs, scrapbooking papers, newsprint, or even fabric. You can paint your own papers to add texture and color, or use found items from around the house, such as foil, duct tape, or paper bags. You can also create a collage with a computer by using a free photo-editing program.